Subway tiling a shower can transform the look and feel of your bathroom, adding a timeless and elegant touch. However, one question that often arises for DIY enthusiasts or those hiring professionals is: How long does it take to complete the subway tiling process? In this comprehensive guide, we’ll explore the factors that influence the duration of subway tiling a shower and provide insights into managing your project efficiently.
Factors Affecting Time Required
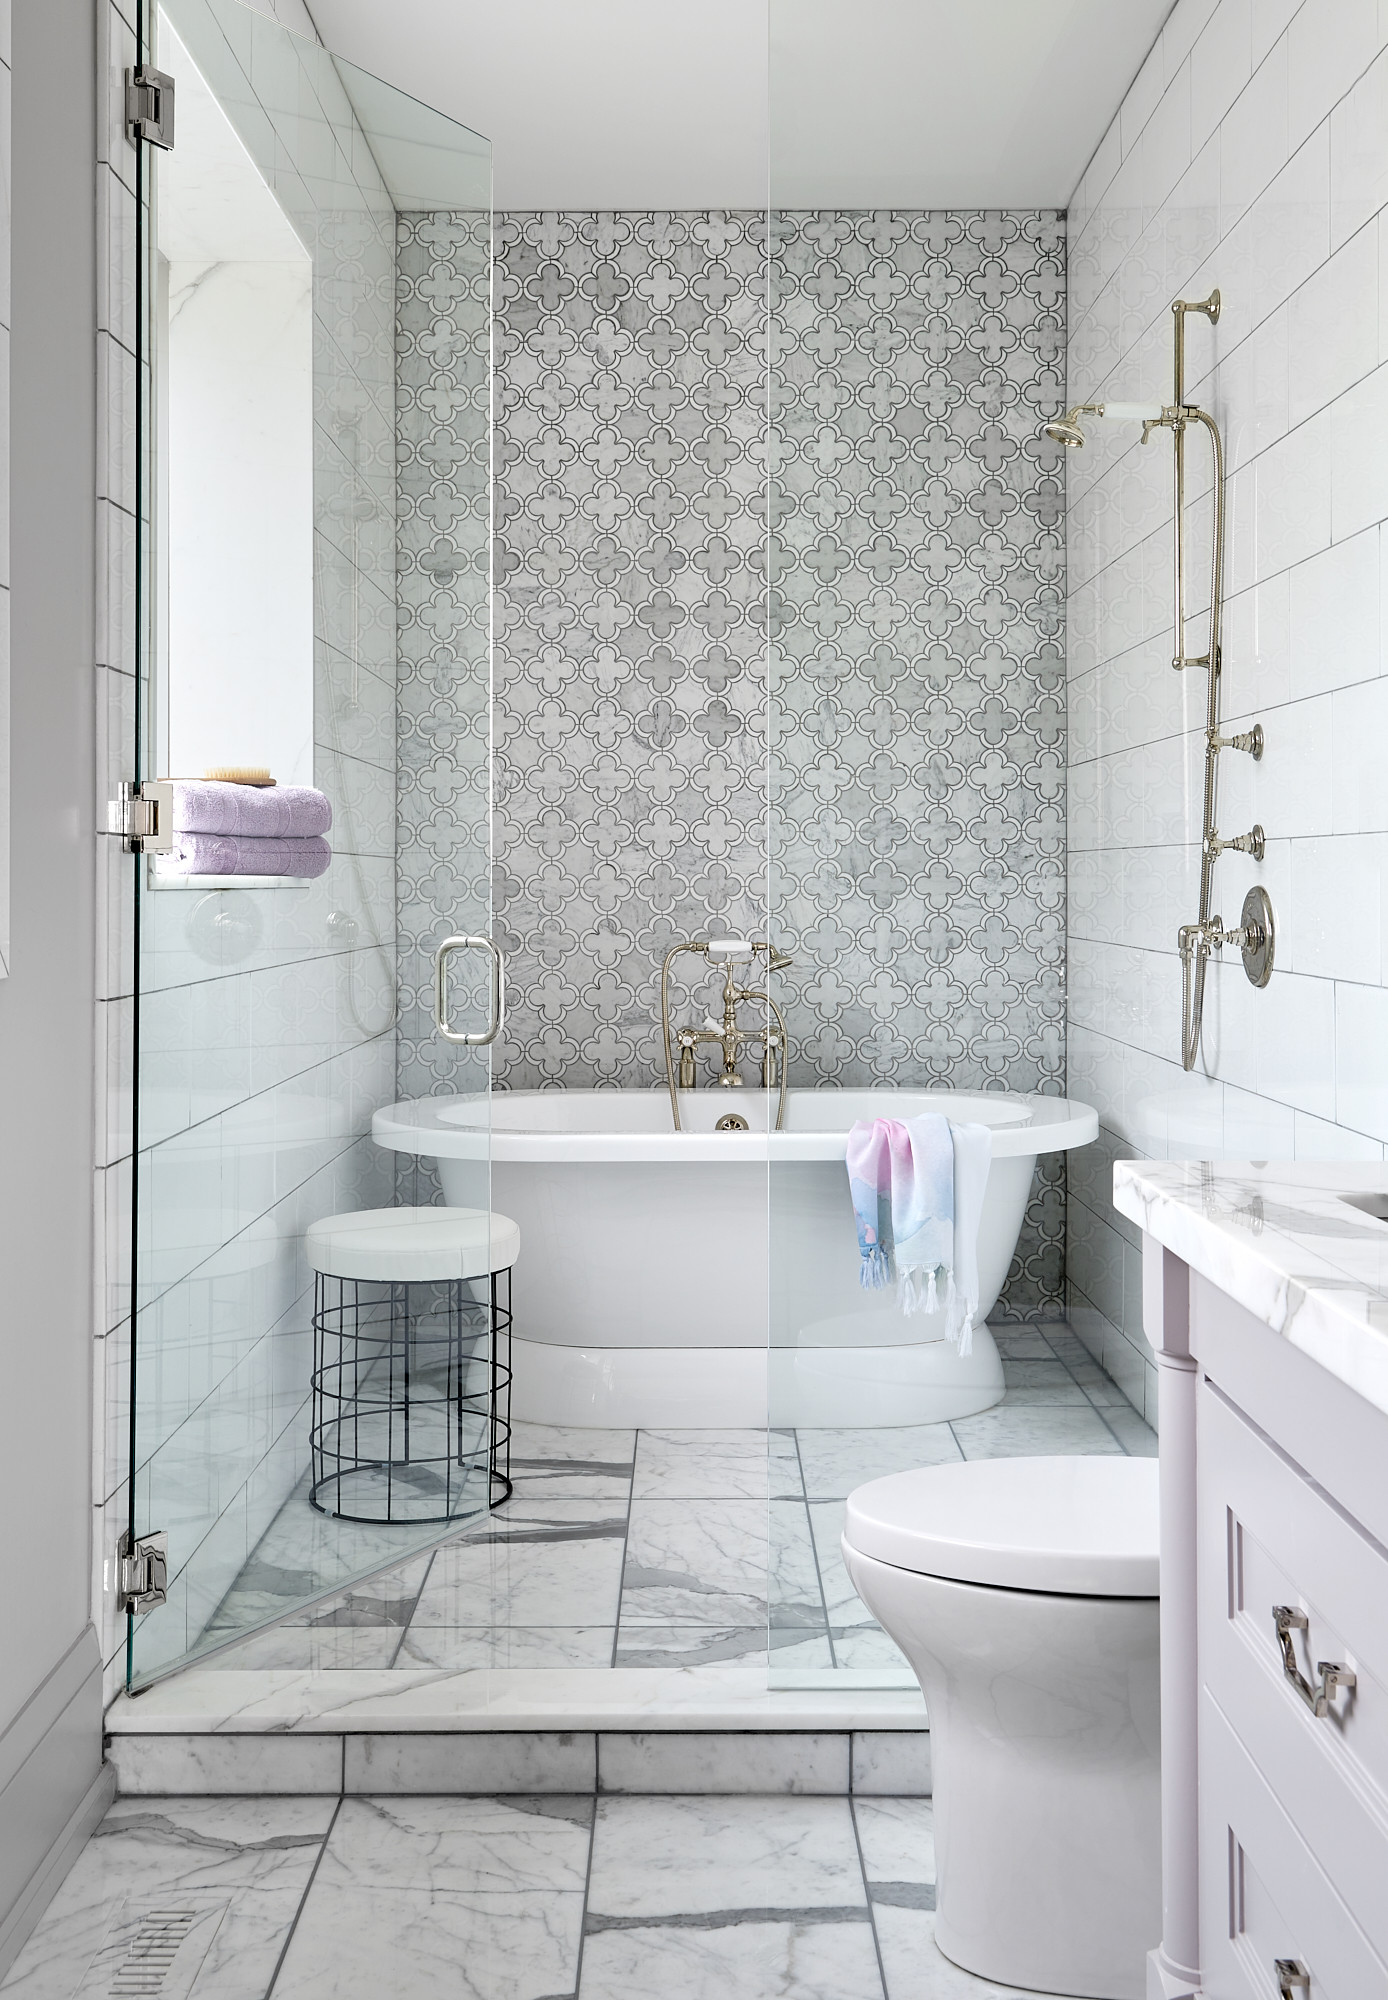
:max_bytes(150000):strip_icc()/TheResidencyBureau-Miranda-Estes-Photography-MapleLeaf-17-50d356f87451401eab70693496f23830.jpg)
Several factors come into play when estimating the time needed to subway tile a shower. Understanding these variables can help you plan your project effectively:
Shower Size
The size of your shower area is a critical factor influencing the time required to subway tile it. Larger showers naturally demand more tiles to cover the walls, which extends the duration of the tiling process.
In a larger shower, you’ll spend more time measuring, cutting, and placing tiles, as well as mixing and applying mortar. Additionally, the larger surface area means more intricate cuts may be necessary around fixtures and corners, adding to the overall time investment.
Conversely, smaller showers with limited wall space can be tiled more quickly due to the reduced number of tiles needed. With fewer tiles to handle and less intricate cutting required, the tiling process is generally more straightforward and less time-consuming.
Tile Size and Material
The size and material of the tiles you choose significantly impact the duration and complexity of subway tiling a shower.
Tile Size:
- Larger Tiles: Larger tiles cover more surface area per piece, leading to faster installation compared to smaller tiles. With fewer individual pieces to handle and position, the tiling process is generally more efficient. However, larger tiles may require more precise cutting for corners and edges.
- Smaller Tiles: Smaller tiles, such as traditional subway tiles measuring 3″ x 6″, require more meticulous placement and alignment due to their higher quantity. While the individual tiles may be easier to handle, the process of spacing and leveling them can be more time-consuming. Additionally, smaller tiles often necessitate more cuts, especially around fixtures and obstacles.
Tile Material:
- Ceramic: Ceramic subway tiles are a popular and affordable option for shower tiling. They are relatively easy to cut and handle, making them suitable for DIY projects. However, certain ceramic tiles may be more prone to chipping during cutting, requiring careful handling.
- Porcelain: Porcelain tiles are known for their durability and resistance to moisture, making them ideal for shower environments. While porcelain tiles may be slightly more challenging to cut than ceramic tiles, their robust nature ensures long-lasting results.
- Glass: Glass subway tiles add a sleek and modern touch to shower walls. However, working with glass tiles requires precision and patience, as they are more prone to chipping and cracking during cutting. Specialized tools and techniques may be necessary for handling glass tiles effectively.
Preparation Work
Proper preparation is essential for a successful subway tiling project in your shower. The preparation phase sets the foundation for the tiling process and ensures a durable and long-lasting finish.
Cleaning the Surface:
Before tiling, it’s crucial to clean the shower walls thoroughly to remove any dirt, grime, or residue. Use a mild detergent or specialized cleaner to eliminate grease, soap scum, and other contaminants. A clean surface promotes better adhesion of the tiles and prevents issues such as tile slippage or delamination.
Surface Priming:
Depending on the condition of the walls and the type of substrate, priming may be necessary to enhance adhesion and moisture resistance. Apply a suitable primer designed for use on shower walls, following the manufacturer’s instructions carefully. Primer helps create a uniform surface and improves the bond between the substrate and the thinset mortar.
Waterproofing:
In wet areas like showers, waterproofing is essential to prevent water penetration and moisture damage. Apply a waterproofing membrane or sealer to the shower walls according to product specifications. Pay particular attention to seams, corners, and joints to ensure comprehensive coverage. Proper waterproofing protects the underlying structure from mold, mildew, and water-related issues, prolonging the lifespan of your tiling installation.
Drying Time:
Allow sufficient time for the cleaned, primed, and waterproofed surfaces to dry completely before proceeding with tiling. Follow the recommended drying times provided by the primer and waterproofing product manufacturers. Rushing this step can compromise the effectiveness of the preparation work and lead to adhesion problems or moisture-related issues down the line.
Skill Level
The skill level of the individual or team performing the subway tiling significantly influences the speed, efficiency, and quality of the project. A higher level of proficiency generally leads to faster completion times and superior results.
Experienced Tilers:
- Efficiency: Experienced tilers are adept at handling the various aspects of subway tiling with precision and efficiency. They can streamline the process, from measuring and cutting tiles to applying mortar and grout, resulting in faster progress.
- Problem-solving: Experienced tilers are familiar with common challenges and pitfalls encountered during tiling projects. They can troubleshoot issues quickly and implement effective solutions, minimizing delays and ensuring smooth progress.
- Attention to Detail: Experienced professionals pay close attention to detail, ensuring precise tile placement, alignment, and spacing. Their meticulous approach results in a visually appealing finish with clean lines and uniform grout joints.
Novice or DIY Enthusiasts:
- Learning Curve: Novice tilers or DIY enthusiasts may encounter a learning curve as they familiarize themselves with the tiling process. They may need more time to understand techniques, tools, and materials, leading to slower progress initially.
- Trial and Error: Novice tilers may experience trial and error as they navigate through the project, particularly when making cuts, applying mortar, or grouting. Mistakes or setbacks may require additional time to rectify, prolonging the overall duration.
- Skill Development: Despite the initial challenges, DIY enthusiasts can develop their tiling skills over time through practice and experience. Each project serves as a learning opportunity, allowing them to gain confidence and proficiency in subway tiling techniques.
Considerations:
- Project Complexity: The complexity of the tiling project also influences the impact of skill level on completion time. While simple, straightforward installations may be manageable for novices, more intricate designs or challenging conditions may require the expertise of experienced professionals.
- Resource Availability: DIY enthusiasts may have limited access to specialized tools, equipment, or materials compared to professional tilers. This can affect the efficiency and speed of the project, as well as the quality of the final outcome.
Tools and Equipment
Tile Cutter:
- Function: A tile cutter is used to cut tiles to size, allowing for precise fitting around corners, edges, and obstacles. Manual tile cutters are suitable for straight cuts, while electric tile saws are used for more intricate cuts and curves.
- Efficiency: Using a tile cutter speeds up the cutting process and produces clean, accurate cuts with minimal effort. This ensures a professional-looking finish and reduces the risk of tile breakage or chipping.
Notched Trowel:
- Function: A notched trowel is used to apply thinset mortar evenly to the shower walls before tile installation. The notches on the trowel create ridges in the mortar, promoting better adhesion between the tiles and the substrate.
- Efficiency: Using a notched trowel ensures consistent mortar coverage and thickness, reducing the likelihood of uneven tile placement or adhesive failure. This results in a secure and durable tiling installation.
Grout Float:
- Function: A grout float is used to apply grout to the spaces between tiles after installation. The flat rubber surface of the float allows for smooth and even grout application, ensuring full coverage and a uniform finish.
- Efficiency: Using a grout float speeds up the grouting process and ensures that grout is evenly distributed between tiles. This reduces the time and effort required for grout cleanup and results in a professional-quality finish.
Tile Saw:
- Function: A tile saw is used to make precise and intricate cuts in tiles, such as curves, angles, and notches. Tile saws come in various types, including wet saws, which use water to cool the blade and reduce dust.
- Efficiency: Using a tile saw allows for accurate and clean cuts in tiles, even for complex shapes and patterns. This ensures a precise fit and professional-looking finish, minimizing the need for adjustments or corrections.
Other Essential Tools:
- Level: Ensures that tiles are installed straight and level, preventing unevenness or crooked lines.
- Spacer Wedges: Maintain consistent spacing between tiles for a uniform and aesthetically pleasing layout.
- Rubber Mallet: Helps gently tap tiles into place and ensures proper adhesion to the mortar.
- Sponge and Bucket: Used for cleaning excess mortar and grout from tiles during installation and cleanup.
Step-by-Step Timeline
To provide a clearer understanding of the subway tiling process and the time involved at each stage, let’s break down the typical timeline:
Preparation (1-2 hours)
Proper preparation is essential for laying subway tiles in your shower. This phase sets the stage for a successful tiling project by ensuring the surfaces are clean, smooth, and ready for tile installation.
Surface Cleaning:
- Cleaning Products: Begin by gathering suitable cleaning products such as mild detergent, vinegar solution, or specialized tile cleaners. Ensure these products are safe for use on your shower walls and won’t damage the surface.
- Scrubbing: Use a scrub brush or sponge to thoroughly clean the shower walls, focusing on areas prone to buildup such as soap scum, mold, and mildew. Pay close attention to corners, grout lines, and around fixtures.
- Rinsing: After scrubbing, rinse the walls thoroughly with clean water to remove any residue from the cleaning products. This ensures a clean and residue-free surface for optimal tile adhesion.
Surface Repair:
- Inspection: Inspect the shower walls for any signs of damage, such as cracks, chips, or loose tiles. Addressing these issues before tiling prevents further damage and ensures a stable substrate for the tiles.
- Repair: Repair any minor imperfections or damage using suitable patching compounds or fillers. Allow these repairs to dry completely before proceeding with tile installation to ensure a smooth and even surface.
Surface Priming:
- Primer Selection: Choose a primer suitable for your shower walls’ material and substrate. Look for a primer specifically designed for use in wet areas to enhance adhesion and prevent moisture damage.
- Application: Apply the primer to the shower walls using a paintbrush or roller, following the manufacturer’s instructions carefully. Ensure thorough coverage of the entire surface, including corners, edges, and seams.
- Drying Time: Allow the primer to dry completely according to the manufacturer’s recommendations before proceeding with tile installation. This typically takes several hours, so plan accordingly to avoid delays.
Waterproofing:
- Waterproofing Products: Select a high-quality waterproofing membrane or sealer designed for use in showers. These products create a protective barrier that prevents water penetration and protects the underlying structure.
- Application: Apply the waterproofing membrane or sealer to the shower walls according to the manufacturer’s instructions. Use a paintbrush or roller to ensure even coverage, paying attention to seams, corners, and joints.
- Curing Time: Allow the waterproofing membrane or sealer to cure fully before tiling. This may take several hours or even overnight, depending on the product. Avoid disturbing the surface during this time to ensure effective waterproofing.
Tile Layout and Planning (1-2 hours)
Before diving into subway tiling your shower, it’s essential to spend time on tile layout and planning. This phase helps you visualize the final result, determine the best placement for tiles, and ensure a cohesive and aesthetically pleasing design.
Measurement and Calculation:
- Measurements: Begin by measuring the dimensions of your shower walls accurately. Measure both the height and width of each wall, as well as any areas where tiles will be cut around fixtures or obstacles.
- Calculations: Use these measurements to calculate the total square footage of tile needed for your shower walls. Factor in extra tiles to account for cuts, waste, and potential mistakes during installation.
Tile Placement:
- Horizontal or Vertical: Decide whether you want to install the subway tiles horizontally or vertically on your shower walls. Consider the overall aesthetic you want to achieve and how the tile orientation will complement the space.
- Centerline: Establish a centerline on each wall to serve as a reference point for tile placement. Use a level and pencil to mark the centerline vertically from floor to ceiling, ensuring symmetry and balance in the layout.
Dry Layout:
- Dry Run: Conduct a dry layout of the tiles on the shower walls without mortar or adhesive. Arrange the tiles according to your planned layout, starting from the centerline and working outward.
- Spacing: Use tile spacers to maintain consistent spacing between tiles and ensure even grout lines. Adjust the placement of tiles as needed to achieve balanced spacing and alignment.
Cutting and Trimming:
- Obstacles: Identify any obstacles such as fixtures, niches, or corners that will require tiles to be cut or trimmed. Measure and mark these areas on the tiles during the dry layout to ensure accurate cuts.
- Cutting Tools: Gather the necessary cutting tools such as a tile cutter or wet saw to make precise cuts in the tiles. Practice using these tools to familiarize yourself with their operation and achieve clean and accurate cuts.
Mixing Thinset Mortar (30 minutes – 1 hour)
Mixing thinset mortar is a crucial step in preparing for subway tiling your shower. Properly mixed mortar ensures strong adhesion between the tiles and the substrate, creating a durable and long-lasting installation. Here’s a deeper look at the process:
Gather Supplies:
- Thinset Mortar: Choose a high-quality thinset mortar suitable for your tile and substrate. Read the manufacturer’s instructions carefully to ensure compatibility and proper mixing ratios.
- Bucket: Use a clean bucket large enough to hold the necessary amount of mortar for your tiling project.
- Water: Have clean water on hand for mixing the mortar. The water-to-mix ratio is critical for achieving the right consistency.
- Mixing Tools: Use a drill with a mixing paddle attachment or a mixing trowel to blend the mortar thoroughly. These tools help achieve a smooth and lump-free consistency.
Mixing Process:
- Add Water: Start by pouring a portion of the required water into the bucket. Follow the manufacturer’s guidelines for the correct water-to-mix ratio, typically specified on the packaging.
- Pour Mortar: Gradually add the thinset mortar powder to the water in the bucket. Avoid dumping the entire bag of mortar at once, as this can lead to clumping and uneven mixing.
- Mix Thoroughly: Use a drill with a mixing paddle attachment or a mixing trowel to blend the water and mortar together. Mix at a slow speed initially to prevent splashing and ensure thorough blending.
- Check Consistency: Continue mixing until the mortar reaches a smooth and creamy consistency, similar to peanut butter or thick cake batter. Avoid overmixing, as this can cause the mortar to dry out too quickly.
- Let Rest: Allow the mixed mortar to rest for a few minutes, known as slaking, before using it for tile installation. This allows the ingredients to fully hydrate and improves the workability of the mortar.
Tips for Success:
- Follow Instructions: Always follow the manufacturer’s instructions for mixing thinset mortar, including water-to-mix ratios and mixing times.
- Consistency is Key: Aim for a consistent and uniform consistency in the mixed mortar to ensure proper adhesion and bonding with the tiles and substrate.
- Mix in Batches: Mix only as much mortar as you can use within the specified working time, typically 1-2 hours. Mixing smaller batches prevents waste and ensures the mortar remains workable throughout the tiling process.
Tile Installation (Varies)
Tile installation is the central stage of subway tiling your shower and requires careful attention to detail, precision, and patience. The duration of this phase varies depending on factors such as the size of the shower, the skill level of the installer, and the complexity of the design. Here’s a deeper exploration of the tile installation process:
Preparation:
- Surface Preparation: Ensure that the shower walls are clean, smooth, and properly primed or waterproofed before beginning tile installation. This creates a suitable substrate for the tiles and promotes strong adhesion.
- Layout Planning: Use your pre-determined layout plan to guide the placement of the tiles. Start by establishing reference lines and marking the layout on the walls to ensure accuracy and symmetry.
Mortar Application:
- Thinset Application: Apply thinset mortar to a small section of the shower wall using a notched trowel, starting from the centerline and working outward. Spread the mortar evenly to achieve consistent coverage and thickness.
- Tile Placement: Press each tile firmly into the mortar, using tile spacers to maintain uniform spacing between tiles. Check the alignment and level of each tile as you go to ensure a straight and even installation.
Cutting and Trimming:
- Custom Cuts: Use a tile cutter or wet saw to make precise cuts in the tiles as needed to fit around fixtures, corners, and obstacles. Measure carefully and mark the tiles before cutting to ensure accuracy.
- Edge Finishing: Use tile nippers or a tile file to smooth and refine the edges of cut tiles, ensuring a seamless transition between tiles and a professional-looking finish.
Grouting:
- Grout Application: Once the tiles are set and the mortar has cured, remove the tile spacers and prepare the grout according to the manufacturer’s instructions. Apply the grout to the joints using a grout float, working it into the spaces between the tiles.
- Grout Cleanup: After applying the grout, use a damp sponge to remove excess grout from the tile surfaces while smoothing and shaping the grout lines. Rinse the sponge frequently and change the water as needed to prevent grout haze.
Drying and Sealing:
- Drying Time: Allow the grout to dry completely according to the manufacturer’s recommendations before using the shower. This typically takes 24-48 hours, depending on the type of grout used and environmental conditions.
- Sealing Grout: Once the grout is fully dry, apply a grout sealer to protect the grout from moisture, stains, and discoloration. Follow the sealer manufacturer’s instructions for application and drying times.
Final Touches:
- Cleanup: Remove any remaining grout haze or residue from the tile surfaces using a clean, damp cloth or sponge. Polish the tiles to reveal their natural shine and ensure a pristine finish.
- Inspect: Conduct a thorough inspection of the tiled shower walls to check for any loose or uneven tiles, grout imperfections, or areas in need of touch-up. Make any necessary repairs or adjustments to achieve a flawless result.
Grouting (1-2 hours)
Grouting is a crucial step in the subway tiling process that not only fills the gaps between tiles but also enhances the overall appearance and durability of the installation. Proper grouting requires attention to detail, patience, and careful execution. Here’s a deeper look at the grouting process:
Preparation:
- Cleanliness: Ensure that the tiled surface is clean and free of any debris, excess mortar, or adhesive before beginning the grouting process. Use a damp sponge or cloth to wipe down the tiles and remove any residue.
- Mixing Grout: Follow the manufacturer’s instructions to mix the grout to the correct consistency. Use a clean bucket and mixing paddle or trowel to combine the grout powder with water until smooth and lump-free.
Application:
- Grout Float: Use a rubber grout float to apply the mixed grout to the tiled surface. Hold the float at a 45-degree angle and use firm, sweeping motions to push the grout into the joints between tiles.
- Work in Sections: Work in small sections of the tiled surface to ensure that the grout does not dry out before it can be properly worked into the joints. Focus on one area at a time, applying the grout evenly and consistently.
Cleaning:
- Excess Removal: After applying the grout to a section of tiles, use the edge of the grout float to remove any excess grout from the surface. Hold the float at a 90-degree angle and scrape diagonally across the tiles to remove excess grout.
- Sponge Cleanup: Once the excess grout has been removed, use a damp sponge to clean the surface of the tiles and smooth out the grout lines. Rinse the sponge frequently and wring it out to prevent excess water from diluting the grout.
Finishing:
- Final Cleanup: After the grout has begun to set but before it has fully cured, perform a final cleanup of the tiled surface. Use a clean, damp sponge to gently wipe away any remaining grout haze or residue from the tiles.
- Sealing: Allow the grout to dry completely according to the manufacturer’s instructions before sealing. Once dry, apply a grout sealer to the grout lines using a small brush or roller, following the manufacturer’s guidelines for application and drying times.
Sealing (30 minutes – 1 hour)
Sealing the grout is an essential final step in the subway tiling process that helps protect the grout lines from moisture, stains, and discoloration. Proper sealing enhances the durability and longevity of the tiled surface while preserving its appearance. Here’s a more in-depth exploration of the sealing process:
Preparation:
- Cleanliness: Ensure that the grout lines are clean and free of any debris, dust, or grout haze before applying the sealer. Use a clean, damp cloth or sponge to wipe down the grout lines and remove any residue.
- Drying Time: Allow the grout to dry completely according to the manufacturer’s instructions before sealing. This typically takes 24-48 hours, depending on the type of grout used and environmental conditions.
Selection of Sealer:
- Type of Sealer: Choose a high-quality grout sealer suitable for your specific grout type and application. There are various types of sealers available, including penetrating sealers, surface sealers, and enhancing sealers.
- Application Method: Determine the best application method for the sealer based on the size of the tiled surface and personal preference. Sealers can be applied using a small brush, roller, or sprayer, depending on the product’s instructions.
Application Process:
- Pouring Sealer: Pour a small amount of the sealer into a clean, shallow container or tray. Avoid pouring directly from the bottle to prevent contamination or spills.
- Brush Application: Dip a small brush or foam brush into the sealer and apply it directly to the grout lines. Work in small sections, ensuring thorough coverage of the grout without overlapping onto the tile surfaces.
- Roller or Sprayer Application: Alternatively, use a small roller or sprayer to apply the sealer to the grout lines. Apply an even coat of sealer, working in sections to ensure complete coverage.
Absorption and Wiping:
- Absorption Time: Allow the sealer to absorb into the grout lines for the specified amount of time as recommended by the manufacturer. This allows the sealer to penetrate the grout and create a protective barrier.
- Excess Removal: After the absorption period, use a clean, dry cloth or sponge to wipe away any excess sealer from the tile surfaces. Wipe gently to avoid removing too much sealer from the grout lines.
Drying and Curing:
- Drying Time: Allow the sealed grout to dry completely before exposing it to moisture or foot traffic. This typically takes 1-2 hours, but refer to the manufacturer’s instructions for specific drying times.
- Curing Time: For optimal protection, allow the sealed grout to cure for at least 24 hours before using the shower or exposing it to water. This allows the sealer to fully bond with the grout and provide long-lasting protection.
Cleanup (30 minutes)
Cleanup is a crucial final step in the subway tiling process that ensures a clean and polished finish to your shower installation. Proper cleanup not only enhances the appearance of the tiled surface but also helps maintain a tidy work environment and prevents any grout or mortar residue from drying and hardening on the tiles. Here’s a more detailed explanation of the cleanup process:
Removing Excess Grout and Mortar:
- Immediate Cleanup: As you progress with the tile installation and grouting, periodically clean up any excess grout or mortar that may have spread onto the tile surfaces. Use a damp sponge or cloth to gently wipe away any stray material before it has a chance to dry and harden.
- Scraping and Wiping: After completing the grouting process, use a grout float or edge of a putty knife to scrape away any remaining grout haze or residue from the tile surfaces. Be careful not to scratch the tiles, and periodically wipe the surface with a clean, damp sponge to remove loosened debris.
Cleaning Grout Lines:
- Final Sponge Cleanup: Once the grout has begun to set but before it has fully cured, perform a final cleanup of the grout lines. Use a damp sponge or cloth to gently wipe away any remaining grout haze or residue from the surface of the tiles, focusing on smoothing and shaping the grout lines.
- Rinsing and Repeating: Rinse the sponge or cloth frequently in clean water and wring it out thoroughly to ensure effective removal of grout residue. Change the water as needed to prevent reintroducing grout particles onto the tiles.
Polishing Tiles:
- Buffing Tiles: After the grout has fully cured and any remaining residue has been removed, use a clean, dry cloth or microfiber towel to buff and polish the tile surfaces. This helps to remove any remaining water spots or streaks and brings out the natural shine of the tiles.
- Inspecting for Imperfections: Take this opportunity to inspect the tiled surface for any imperfections, such as uneven grout lines or stray adhesive residue. Address any issues promptly to ensure a flawless finish to your subway tiled shower.
Final Touches:
- Protective Measures: Consider applying a tile and grout sealer to the tiled surface to provide additional protection against moisture, stains, and discoloration. Follow the manufacturer’s instructions for application and drying times to ensure optimal results.
- Cleanup of Tools and Equipment: Thoroughly clean and rinse all tools, equipment, and mixing containers used during the tiling process to prevent the buildup of dried grout or mortar. Store tools in a dry, clean area to keep them in good condition for future use.
Tips for Efficient Tiling
To expedite the subway tiling process and minimize potential delays, consider the following tips:
- Plan Ahead: Create a detailed project plan outlining tasks, materials, and timelines.
- Organize Materials: Gather all necessary tools and materials before starting to avoid interruptions.
- Work Methodically: Follow a systematic approach to tiling, starting from one corner and progressing methodically across the walls.
- Minimize Interruptions: Dedicate uninterrupted blocks of time to tiling to maintain focus and momentum.
- Seek Assistance: Enlist the help of friends or family members to expedite tasks like mixing mortar, cutting tiles, and grouting.
- Prioritize Quality: While speed is important, prioritize quality craftsmanship to ensure a durable and aesthetically pleasing finish.
Conclusion
Subway tiling a shower is a rewarding DIY project that can enhance the visual appeal and functionality of your bathroom. While the time required to complete the process varies based on factors like shower size, tile material, and individual skill level, careful planning and efficient execution can help streamline the project. By understanding the key steps involved and implementing time-saving strategies, you can achieve professional-quality results within a reasonable timeframe.